Church Window Cookies Recipe
Some of the links in this post are affiliate links. This means if you click on the link and purchase the item, I will receive an affiliate commission at no extra cost to you. All opinions remain my own.
As an Amazon Associate I earn from qualifying purchases.
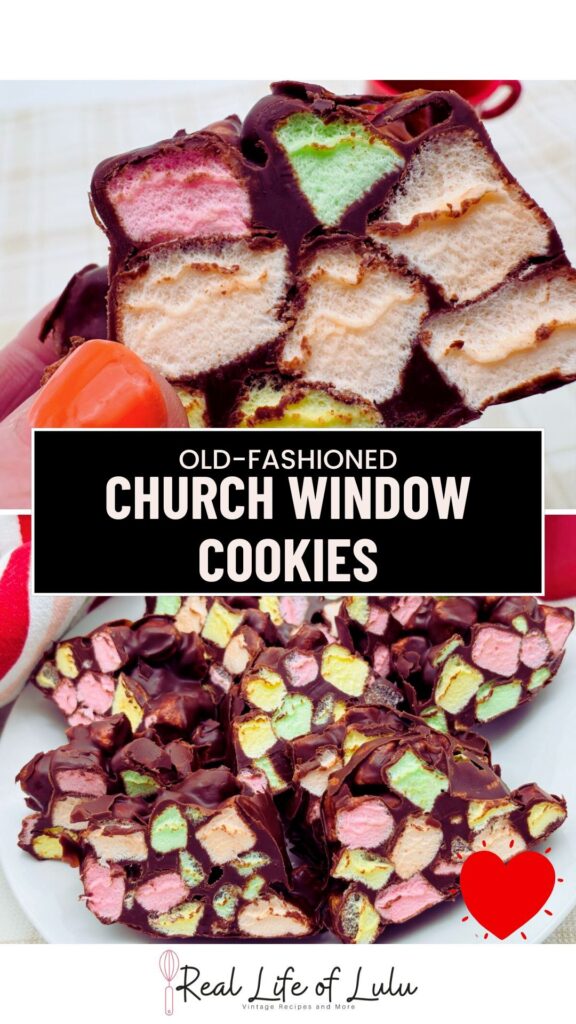
Church Window Cookies are pure retro fun, and they could not be easier. Semi-sweet chocolate hugs those bright marshmallows, and every slice looks like a little stained-glass window. My grandma brought them to every church potluck, and I still sneak a slice while the logs are chilling.

They first popped up in mid-century church and community cookbooks, especially around the holidays. The method is simple, melt, stir, roll, and chill. Slice them up and watch the colorful pieces disappear fast.
Ingredients You Will Need
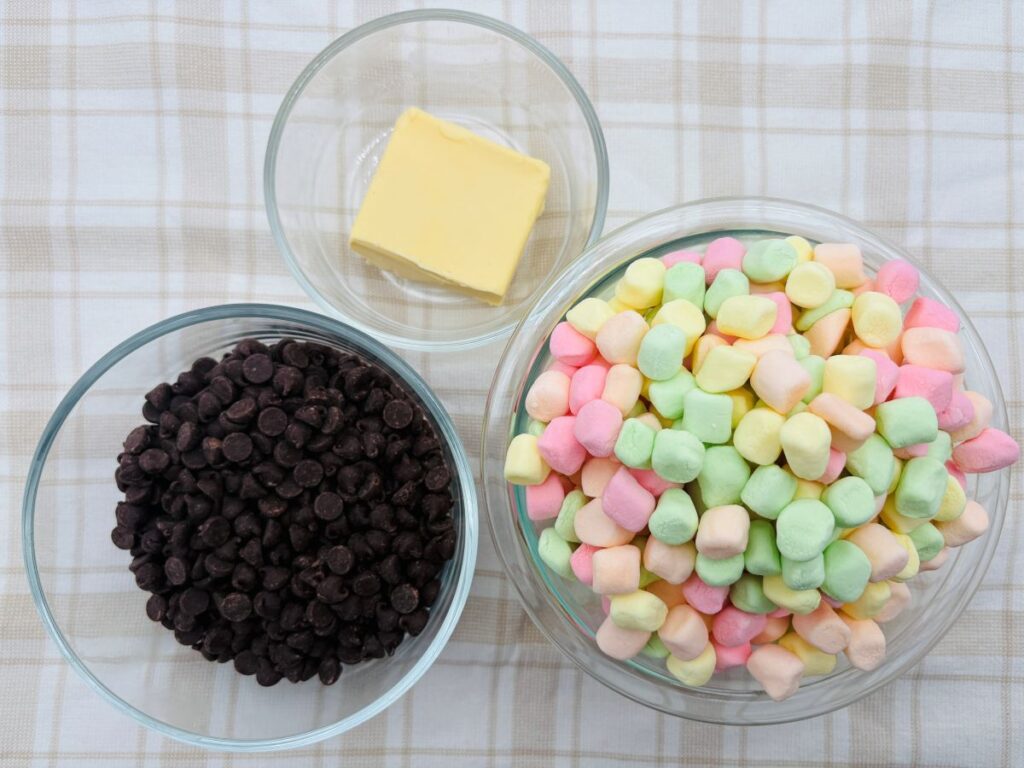
Butter: Melts with the chocolate to create a silkier mixture that’s easier to shape. It also keeps the chocolate from getting too firm and crumbly once chilled, so the slices cut clean and neat.
Semi-sweet chocolate chips: Melt into a smooth coating that holds everything together, giving the cookies their rich, fudgy flavor. The slight bitterness balances the sweetness of the marshmallows, so they aren’t overly sugary.
Colored mini marshmallows: add sweetness, a soft chewy texture, and those fun “stained-glass window” pops of color when sliced.
Frequently Asked Questions
Do the marshmallows melt? Nope. Since the chocolate cools slightly before mixing, the marshmallows stay whole and keep their color and shape.
Why do the logs need to chill for so long? Chilling firms up the chocolate so the slices cut cleanly and hold their shape. If they’re too soft, the marshmallows will squish.
Do I have to use parchment paper? Parchment makes shaping and wrapping the logs super easy, but plastic wrap works in a pinch. Just keep it tight so the logs stay round.
Why did my chocolate mixture get grainy? It may have overheated. Melt slowly and gently. A double boiler or low microwave power keeps it smooth and glossy.


Helpful Tips
Melt low and slow. Keep the heat gentle so the chocolate doesn’t scorch or seize. Smooth chocolate = clean, picture-perfect slices.
Chill long enough. Give them at least 4 hours or overnight; the colder they are, the easier they are to slice.
Use fresh marshmallows. Older marshmallows can dry out and don’t stick as well to the chocolate.
Use mini marshmallows only. Full-size marshmallows don’t slice as cleanly and can overwhelm the chocolate.
Mix quickly but gently. Once the marshmallows go in, you have a short window before the chocolate starts firming up.


Storage Tips
Refrigerate for best results. Store slices in an airtight container in the fridge for up to 7 days to keep the chocolate firm and the marshmallows soft.
Layer with parchment paper. If stacking pieces, add parchment between layers to prevent sticking or smudging.
Serve from the fridge. They soften quickly at room temperature; just set them out a few minutes before enjoying.
Freeze the logs for later. Wrap each chilled log tightly in parchment and then in plastic wrap or foil. Freeze up to 2 months.
Slice frozen logs as needed. They cut beautifully while still firm, so you can slice a few at a time for snacks or last-minute treats.
Avoid warm spots. Keep them away from sun and heat sources; melted chocolate = messy stained glass.


Substitutions and Variations
Chocolate: Use milk chocolate for a sweeter, creamier flavor. Try dark chocolate or bittersweet if you like a richer, less sweet cookie. Use white chocolate for a sweeter, candy-like flavor and extra bright “windows.”
Texture Add-Ins: Stir in chopped walnuts or pecans for crunch. Mini chocolate chips or butterscotch chips can sneak into the mix, too!
Outside Coatings: Roll the logs in coconut flakes for a vintage look. Coat with finely chopped nuts for added crunch. Try colorful sprinkles for birthday or party vibes.
Peanut butter version: Swirl in a few tablespoons of peanut butter before rolling.
Mocha version: Add a teaspoon of instant espresso powder to the melted chocolate.
S’mores version: Mix in crushed graham crackers.

What to Serve with Church Window Cookies
A cookie tray with other classic treats. Think Peanut Butter Blossoms, Sugar Cookies, Fudge, and Buckeyes for a nostalgic holiday spread.
Fruit platter. Fresh berries or citrus slices can help cut the richness and add color to the table.
Holiday candy assortment. Peppermint bark, caramels, or chocolate-covered pretzels fit right in with the retro vibe.
Holiday brunch dessert. Serve alongside cinnamon rolls, fruit salad, and a coffee bar for a sweet finish.
Hot tea station. Church Window Cookies go perfectly with a cup of peppermint tea, chai, or a cozy herbal blend.

Other Recipes You May Enjoy
If you like my Church Window Cookies, you might also like my Chocolate Pinwheel Cookies or my Monster Cookies. These Haystack Cookies are also delicious.
Final Thoughts
These bright little slices take me right back to childhood, sneaking one from the fridge when no one was looking. They’re simple, cheerful, and always the first thing to disappear from the cookie plate. Make a batch to share, and you might just start a new family tradition.
Church Window Cookies

Equipment
Ingredients
- ½ Cup Butter
- 2 Cups Semi-Sweet Chocolate Chips
- 1 Package Rainbow-Colored Miniature Marshmallows 10 ounces
Instructions
- Place the butter in the top of a double boiler set over gently simmering water. Stir until melted and smooth. No double boiler? Set a heat-safe bowl over a pot of simmering water, keeping the bowl above the water.
- Add the chocolate chips and stir until melted. Remove from the heat. Let it cool for 10 minutes at room temperature, stirring occasionally.
- Add marshmallows to the melted chocolate and stir to coat the marshmallows fully.
- Place two 15×18-inch pieces of parchment paper on a flat surface. Place half of the chocolate-marshmallow mixture onto the middle of each piece of parchment paper and shape it into a 12-inch long log using a rubber spatula.
- Wrap the logs tightly in the parchment and refrigerate for at least 4 hours.
- After four hours or more, cut into 1/2-inch thick slices.
Notes
Amazon and the Amazon logo are trademarks of Amazon.com, Inc, or its affiliates.