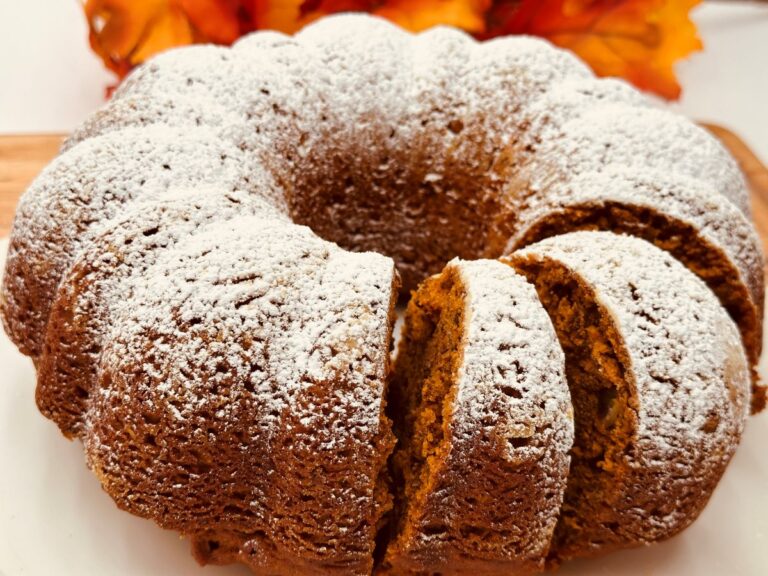
Old-Fashioned Devil’s Food Cake with 7-Minute Icing
Some of the links in this post are affiliate links. This means if you click on the link and purchase the item, I will receive an affiliate commission at no extra cost to you. All opinions remain my own.
As an Amazon Associate I earn from qualifying purchases.
Devil’s Food Cake has a fun little backstory. It showed up in early 1900s cookbooks as the deeper, chocolate-loving cousin to airy Angel Food, and it only got more popular through the 1920s, 30s, and into the 40s. This version comes straight from my grandma’s 1940s cookbook, cocoa-rich, simple, and meant for real home kitchens. It tastes like Sunday dessert at Grandma’s house.

And the frosting is a throwback, too. Her same cookbook has the classic 7-minute icing, whipped over a double boiler into glossy, marshmallow-style swirls. It’s quick, it’s fluffy, and it sets up beautifully on a cooled cake. Together they make the kind of old-fashioned chocolate cake you cut into “just to taste,” then somehow go back for another slice.
Ingredients You Will Need
For the Devil’s Food Cake:

- Flour – Provides the structure of the cake and helps it hold together.
- Cocoa powder – Gives the cake its deep chocolate flavor and dark color.
- Sugar – Sweetens the cake and also helps keep it moist.
- Eggs – Bind everything together and add richness and structure.
- Butter or shortening – Adds tenderness, moisture, and flavor.
- Baking soda or baking powder – Creates the rise, making the cake light and fluffy.
- Salt – Balances the sweetness and enhances the chocolate flavor.
- Milk or water – Adds moisture so the batter comes together smoothly and bakes evenly.
- Vanilla – Rounds out the chocolate flavor with a warm, aromatic note.
For the 7-Minute Icing:

- Egg white – Whips up into a fluffy base that gives the icing its light, airy texture.
- Cream of tartar – Stabilizes the egg white so it whips up firm and glossy.
- Boiling water – Helps dissolve the sugar and sets the stage for the icing’s structure.
- Sugar – Sweetens the icing and helps create that marshmallow-like consistency.
- Salt – Just a pinch to balance the sweetness.
- Vanilla – Adds a warm, fragrant flavor to finish.
Frequently Asked Questions
What’s the difference between Devil’s Food Cake and regular chocolate cake? Devil’s Food Cake is darker, richer, and usually lighter in texture thanks to extra cocoa and baking soda. It has more of that deep, old-fashioned chocolate flavor.
Do I really need a double boiler for the icing? It helps, but you can also use a heatproof bowl set over a pot of simmering water. The key is gentle, even heat while you whip.
Can I frost this with something besides 7-minute icing? Of course. A simple buttercream or whipped cream frosting works, but if you want the vintage vibe, stick with the glossy, fluffy 7-minute icing.
Why does the icing need to be beaten constantly? Continuous beating keeps the egg white from cooking into scrambled eggs and whips air into the mixture. That’s what gives you fluffy, cloud-like frosting.
Can I make the icing without a hand mixer? It’s possible with a whisk, but it’s a serious arm workout. A hand or stand mixer makes it much easier to get the right fluffy texture.


Helpful Tips
Room temperature ingredients – Let your eggs, butter, and milk sit out for a bit before baking. This helps everything blend smoothly and gives you a more even crumb.
Don’t overmix – Once the flour goes in, stir just until combined. Overmixing can make the cake tough instead of tender.
Boil the water first – For the icing, make sure your water is already boiling before you start. That way, the sugar dissolves fully and you don’t get gritty frosting.
Serve the same day for best texture – 7-minute icing is fluffiest and prettiest right after it’s made, so frost close to serving time.


Storage Tips
For the cake (before frosting):
- Wrap cooled cake tightly in plastic wrap and keep at room temperature for up to 2 days.
- For longer storage, freeze the wrapped cake in a freezer bag for up to 2 months. Thaw at room temperature before frosting.
For the cake (after frosting):
- Best enjoyed the same day, since the icing sets quickly and doesn’t hold up for long.
- If you do have leftovers, cover the cake loosely with foil and keep it at room temperature. It will stay fluffy for about 24 hours.
- Avoid airtight containers once it’s frosted; the icing can turn sticky.
- Don’t refrigerate unless you absolutely have to. The icing doesn’t love moisture and can weep or get grainy.
Extra tips:
- If you know you’ll need the cake for a later day, bake and freeze the cake layers first, then make and add the icing fresh the day you plan to serve.
- Individual slices don’t store as well once frosted, but if you must save them, wrap lightly in wax paper and store at room temperature for a day.


Substitutions and Variations
Cocoa powder – Natural cocoa is traditional, but Dutch-process cocoa makes the cake darker with a smoother flavor.
Sugar – Brown sugar can be used instead of white sugar in the icing for a caramel-like flavor.
Flavoring – Vanilla is classic, but almond extract, peppermint, or lemon extract all work well for the icing.
Mocha twist – Add a teaspoon of instant espresso powder to the batter to boost the chocolate flavor of the cake.
Coconut topping – Sprinkle shredded coconut over the freshly frosted cake.
Chocolate drizzle – Finish the frosted cake with a drizzle of melted chocolate for a modern touch.


What to Serve with Devil’s Food Cake
Appetizers: Kick things off with a platter of deviled eggs sprinkled with paprika, or set out cocktail meatballs in a tangy grape jelly–chili sauce glaze that always disappears fast.
Drinks: Pour tall glasses of sweet tea for a classic touch, or serve a fizzy sherbet punch with 7Up for that nostalgic party feel.
Sides: A crisp garden salad with a simple vinaigrette balances out the richness of the meal, while buttery dinner rolls are perfect for rounding out the table.
Main Dishes: Baked ham glazed with brown sugar makes a perfect centerpiece, or go with crispy fried chicken for a crowd-pleasing comfort food option.
Other Desserts: Alongside Devil’s Food Cake, you could offer a bowl of fruit salad for something lighter, or whip up a batch of classic lemon bars to add a bright, tangy contrast.

Other Recipes You May Enjoy
If you like Devil’s Food Cake, you might also like my Dr Pepper Cake or my Chocolate Zucchini Cake. This recipe for Death By Chocolate Cake is also delicious.

Final Thoughts
Devil’s Food Cake with 7-Minute Icing is more than just dessert; it’s a sweet slice of history from a well-loved cookbook. Every bite is rich, nostalgic, and just a little bit irresistible. Bake it once, and you’ll see why this classic has been passed down for generations.
Devil’s Food Cake

Equipment
Ingredients
- 1 Cup Sugar
- ¾ Cup Cocoa
- 1 Cup Milk
- 1 Egg
Part 2
- 1 Cup Sugar
- ¾ Cup Shortening Butter Flavored
- ½ Cup Milk
- 2 Eggs
- 2 Cups Cake Flour
- ⅛ teaspoon Salt
- 1 teaspoon Baking Soda
- 1 teaspoon Vanilla Flavoring
Instructions
- Stir 1 cup of sugar and cocoa together.
- Beat the egg separately and add to the cocoa mixture.
- Pour in 1 cup of milk.
- Cook over double boiler until smooth and thick (mine didn’t thicken too much).
- Let it cool.
Part 2
- Set oven to 375 degrees.
- Cream the shortening and 1 cup of sugar together.
- Beat 2 eggs well and then add them to the shortening mixture.
- Beat the entire mixture thoroughly.
- Sift, then measure the flour.
- Sift flour with baking soda and salt.
- Add ½ cup of milk and the flour mixture gradually, alternating with the creamed shortening mixture.
- Add vanilla followed by cooled cocoa mixture.
- Thoroughly beat together.
- Oil a layered cake pan or a 9×13 pan.
- Pour mixture into chosen pan.
- Bake at 375 degrees for 20 minutes.
- Frost with seven-minute icing or another icing of your choice once the cake has cooled.

Seven Minute Icing
Equipment
Ingredients
- 1 Egg White
- ⅛ teaspoon Cream of Tartar
- ⅓ Cup Boiling Water
- 1 Cup Sugar
- 1 Pinch Salt
- ½ teaspoon Vanilla Flavoring
Instructions
- Put water in the bottom of a double boiler and place burner on high to boil.
- Boil about a cup of water in separate small pan.
- Stir sugar, salt, cream of tartar, and boiling water together and pour into upper pan of double boiler.
- Put over the bottom of the double boiler (water should be boiling before doing so).
- Add egg white (unbeaten).
- Beat for about seven minutes with mixer, or until the icing is thick and ready to spread.
- Add vanilla.

Amazon and the Amazon logo are trademarks of Amazon.com, Inc, or its affiliates.


This cake looks so delicious. I love cake 🎂. I totally have to make this recipe.
Thank you! It is so yummy and the frosting is to die for! 🙂
I’ve never heard of a devils food cake but it looks and sounds amazing!
Thank you! It has a much stronger chocolate flavor than plain chocolate cake and it’s very popular in the U.S. 🙂
I never heard of devils cake but this sounds like a must-try! I love that you guys bake for your anniversary x
In my opinion, it is far better than plain chocolate cake! I didn’t know it was an American flavor. You must try it if you haven’t. Thank you, it is very fun. 🙂
Hi, the recipe needs an egg added to the chocolate sauce ingredients I believe. Just thought I’d help.
I enjoy all of your recipes. Thank you
Oh my goodness! Thank you for pointing that out. I really appreicate it! How did I forget that?